Justin Berg
March 22, 2020Website sitemaps are crucial for allowing Google to crawl, find new pages, and rank the content of your website.
Without a sitemap in place, you’re not allowing your website the best chance of ranking for competitive keywords.
In order for webpages to be found by search engines, we need to make the discovery process as easily as possible.
That’s exactly where sitemaps enter the picture.
In this article, we will take a look at a sitemap example, how to set it up and best practice for using XML site maps with your own domain.
Let’s first talk about XML and sitemaps and why they’re so important when it comes to SEO.
XML format is a markup language which defines syntax for encoding documents that both humans and computers can read.
You can think of an XML file as almost a text file, but with structure to the data which is added through tags.
A sitemap allows search engines such as Google find, crawl and index the pages on your website.
You can think of a sitemap as essentially a list of URLs which you want search engines to crawl and index.
An XML sitemap not only helps search engines to know what pages exist on your website but also helps to understand the structure of your website.
This, in turn, has an effect on how your website ranks in Google and how its found based on these pages and their relevance.
If pages do not exist in your XML sitemap may still be found by search engines, even if they’re not added to the file, but these pages often times can be deemed as less important. If your pages can’t be found, that means they won’t be crawled or indexed.
Sitemaps are a great way to understand which content is both accessible to humans, and to search engines.
You’ll want to keep an eye on this to see if there are test pages, or a large amount of non-crucial pages that can be removed completely from your website, or no-indexed from search as they have no inherent value to searches.
Remember, the less content you have indexed Google, the better.
You want to prefer high-quality content and fewer pages, over having a large number of mediocre pages.
There are a few different types of sitemaps, so let’s take a look at each more in-depth.
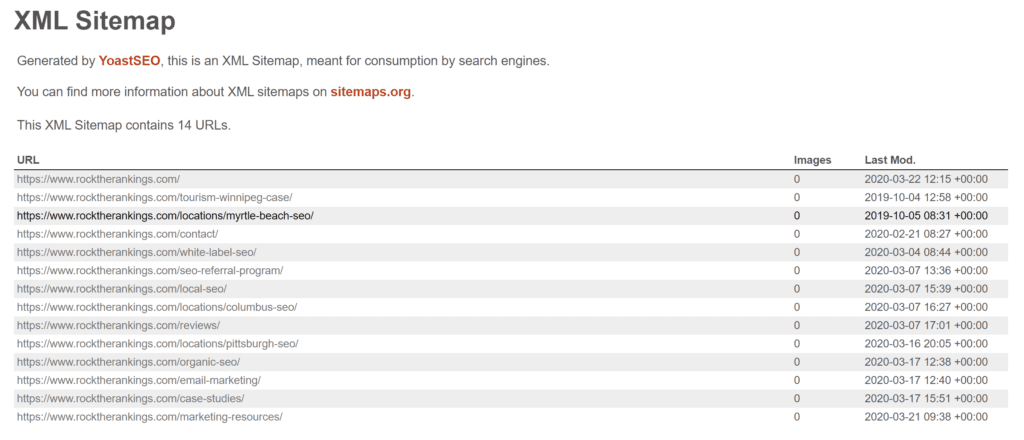
Let’s now take a look at a real XML sitemap example to analyze.
For Rock The Rankings, here’s our sitemap.xml example:
https://www.rocktherankings.com/sitemap.xml
Our website is built using WordPress, and the XML sitemap is automatically generated using the Yoast SEO plugin.
Inside of this XML file, you’ll find the main index file which houses all of the sitemaps for pages and posts.
Pages are the content that we have set up for our services and locations, whereas posts represent content that resides on the blog section of our website.
You’ll also often times see a few other columns of data in the sitemap:
<urlset xmlns="http://www.sitemaps.org/schemas/sitemap/0.9">
Depending on the structure of your website, you might find other folder structures that can be created such as products, services, and so forth.
Here’s the actual sitemap index example for the pages on our website:
https://www.rocktherankings.com/page-sitemap.xml
Another type of sitemap is an HTML sitemap.
The purpose of the HTML sitemap is to allow users to easily navigate and find pages that exist on your website.
The same as an XML sitemap, the HTML sitemap lists out all of the pages on your website which you wish to be indexed in Google.
Although these are built for human eyes, HTML sitemaps are also very beneficial from Google bots to crawl and understand the pages of your website.
Below is an HTML sitemap example from Rock The Rankings:
https://www.rocktherankings.com/site-map/
Similar to the purpose of a standard sitemap, which shows the content that is on your website and allows crawlers from Google and other search engines to discover the content, video sitemaps contain metadata about all of the videos on your website.
This helps Google to display your videos in search results where applicable. Video sitemaps include data about the length of a video, the title, and a short description of the video’s content.
Video content is appearing more often in search to satisfy user’s queries, so if you have great video content that can help users to answer their Google queries, then it’s worth setting up a video sitemap to ensure your content is being found.
You can manually mark-up your videos and create a video sitemap using a sitemap generator such as xml-sitemaps.com.
Additionally, you can also user a plugin to create sitemaps depending on your CMS.
If you’re running on WordPress, both Yoast and Jetpack are great automated ways you can enable video sitemaps on your website.
Sitemaps normal fall under the Technical SEO realm, but you don’t need to be an expert to start setting one up.
If you’re using a popular CMS such as WordPress, there are plenty of plugins that will create and manage the XML sitemap for you.
YoastSEO comes highly recommended, as there’s very little setup and there’s not much to do in terms of managing the sitemap – other than keeping an eye from time to time to clean-up any issues.
If you’re on a custom-built site, you can also use a tool such as SiteBulb which will crawl your entire site and can export an XML sitemap for you to upload to your domain.
Let’s take a look now at the best practices for managing both XML and HTML sitemaps.
Sitemaps are super important for the indexing and rankings of your website, therefore you want to ensure that the pages listed inside of your sitemap are correct and always up-to-date.
You’ll also want to ensure that no broken pages exist in the sitemap and that you quickly address any 404 errors appropriately.
If you fail to keep your sitemaps up-to-date, newly created pages might not be found as easily (or at all).
If you’re using a CMS such as WordPress, as mentioned above, you’ll most likely have the functionality built-in already to create and manage sitemaps automatically.
Once you’ve created an XML sitemap, you’ll also want to submit it for indexing using the appropriate webmaster tools.
In Google’s case, you’ll want to head over to Google Search Console.
By opening up Google Search Console, and navigating to “Sitemaps” on the left-hand menu, you’ll be able to enter the URL of your sitemap and submit it to Google:
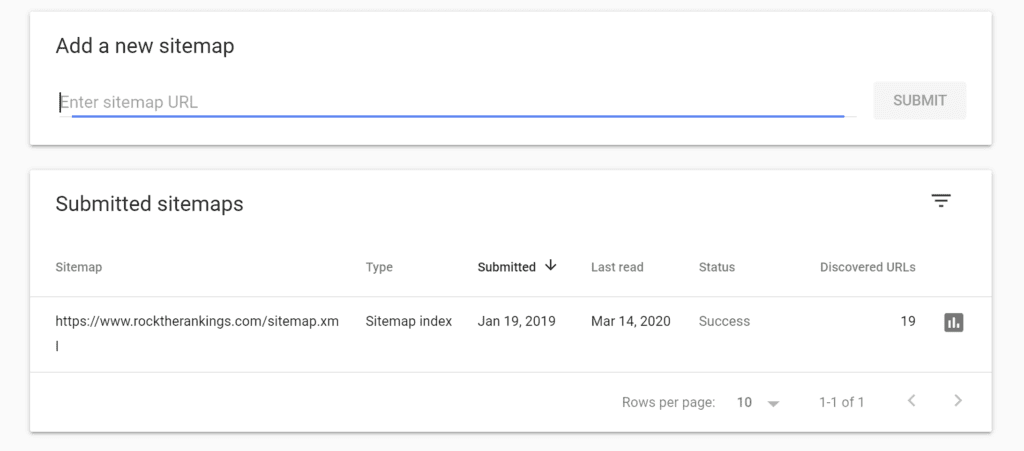
By doing so, Google knows where to find your sitemap when it crawls, and it will then show the last time the site map was read, as well as the status and any discovered issues for quick troubleshooting.
You’re also going to want to ensure that you link to your XML sitemap files in your robots.txt file.
The robots.txt file essentially tells Google how it should crawl your website.
We want to ensure that we’re giving clear instructions to search engines how to crawl our website in the most efficient way possible.
If Google is unable to locate your XML sitemap, you could be limiting your pages from being crawled and indexed in Google.
You’ll want to add the following line to your robots.txt file to properly point to the XML sitemap:
“Sitemap: XML Sitemap URL“
In the example of Rock The Rankings, we’ve added to the following line to robots.txt:
Sitemap: http://13x.agency/sitemap.xml
Although noindex is not directly included in a sitemap, it’s an important concept to understand.
If you want to tell Google, Bing or any other search engine not to allow a page to be indexed in search, you’re going to want to do two things:
Noindex is going to tell web crawlers to ignore this page, and not index it. In order to noindex a page, you’ll want to use meta tag in the <head> of a page and include the command as such:
<meta name=”robots” content=”no index”>
Again, if you’re running on a CMS, most likely functionality will be included to easily do this on a page-by-page basis.
Founder of Rock The Rankings, an SEO partner that helps B2B SaaS brands crush their organic growth goals. An avid fan of tennis, and growing micro-SaaS businesses on the weekend. 2x SaaS Co-Founder – Currently working to build and scale Simple Testimonial.
Sorry, no posts matched your criteria.
Book a 1-on-1 intro call with our founder that includes a FREE custom marketing plan. Start growing faster, today.