Summarize Article


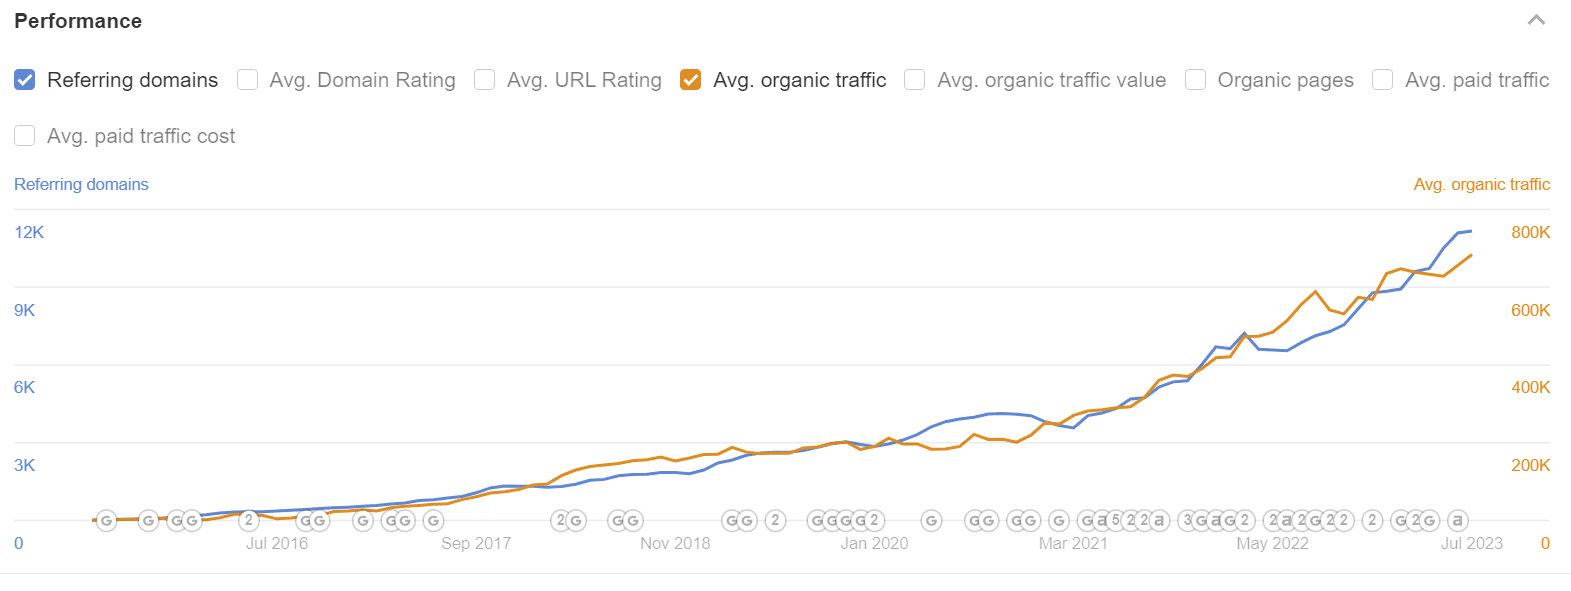
Optimizing your website for search engines is crucial.
It’s free traffic that requires minimal effort in most cases and can be a core driver of customer acquisition.
Optimizing your website for SEO isn’t necessarily the challenging part, rather building content and links is generally where a lot of SaaS business struggle.
In this guide, we will explore the technical aspects of optimizing your Webflow site for SEO and provide tips on how to improve your website’s overall performance.
Title tags and meta descriptions are HTML attributes that describe the content of your page.
They appear in search engine results and help users decide to click through to your site.
To maximize their value, ensure your title tags and meta descriptions are unique and descriptive.
The title tag should include the primary keyword for the page, and the meta description should be enticing and highlight the page’s unique value proposition.
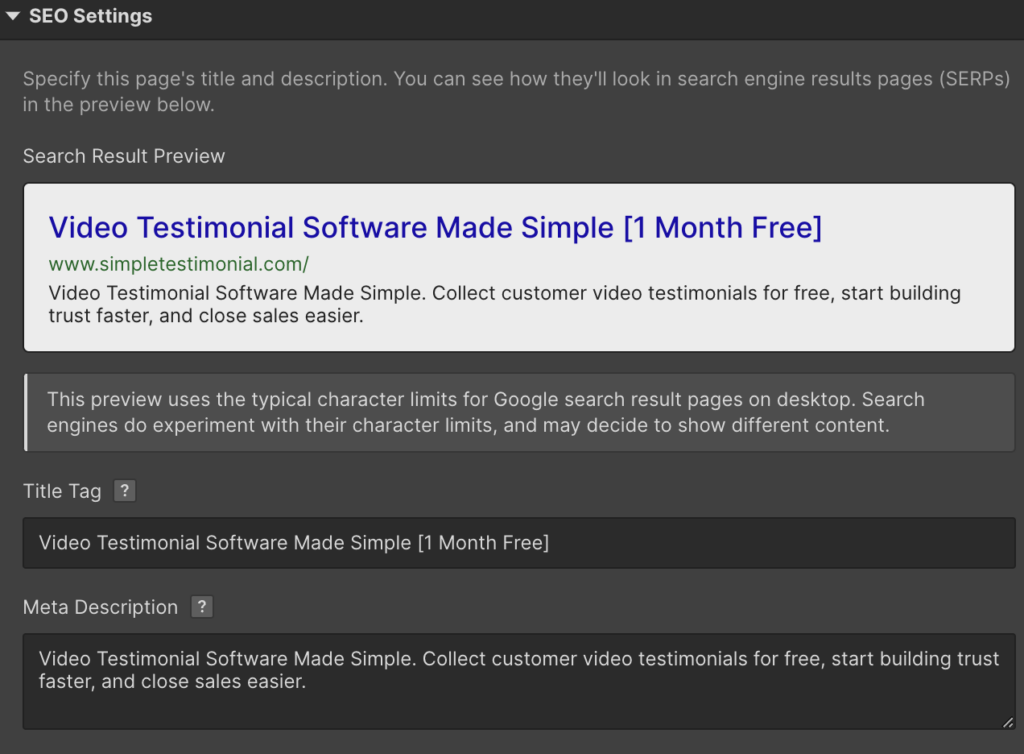
Example: For Simple Testimonial, want our homepage to target the primary keyword “video testimonial software” and for that reason, we’ll include it naturally within both our meta description, and well as the title.
The header elements on your page, or H1, H2, and H3 tags, help search engines understand the content hierarchy of your page.
They also make it easier for users to skim and scan your page. A best practice is to use only one H1 tag on a page and include relevant primary and secondary keywords in your H2 and H3 tags.
Images are essential components of your website, but they can also slow down page load speed. To optimize your images for SEO and improve performance, ensure they are compressed and have descriptive alt text.
Alt text provides context to search engine crawlers and visually impaired users, making it an essential component of website accessibility.
The structure of your URLs can impact how search engines crawl and index your site. Use a consistent URL structure that includes primary and secondary keywords and reflects the structure of your site hierarchy. Avoid using underscores, special characters, or dates in your URLs as they can make it difficult for users and crawlers to understand the purpose of the page.
A table of contents is a helpful navigational feature for users and can also provide valuable SEO benefits. It enables search engines to more easily understand the structure of your content. The table of contents should include links to the subheadings on your page, making it easier for users to jump to the sections they’re interested in.
When linking to external sites on your pages, it’s best practice to open them in a new tab. This ensures that your site remains open, providing a better user experience. Additionally, search engines prefer it when users stay on your site longer, as it indicates the content is relevant and engaging, potentially boosting your SEO.
Webflow is a powerful website builder that enables you to create beautiful, responsive websites without any coding knowledge. However, to ensure that your website is visible and accessible to your target audience, you need to optimize it for search engines. In this article, we’ll explore some essential technical SEO tips for Webflow that can help improve your site’s visibility and ranking in search results.
When you create a website on Webflow, the platform automatically generates pages that may not be relevant to your site’s content. These pages can clutter your search results and impact your site’s SEO. To remove them, you can use the “noindex” tag in your site’s code or your Webflow CMS settings. This tag tells search engines not to index specific pages on your site, ensuring that only relevant pages appear in search results.
It’s important to note that you should only use the “noindex” tag on pages that are truly irrelevant to your site’s content. If you use it on important pages, you may inadvertently harm your site’s SEO and visibility.
When you move content from one page or URL to another, it’s essential to use 301 redirects. These redirects ensure that users and crawlers are redirected to the new location and that any backlinks to the old page are redirected to the new one, preserving link equity and preventing a negative impact on SEO.
In Webflow, you can implement 301 redirects using the “Redirects” feature in the “Hosting” tab.
Simply enter the old URL and the new URL, and Webflow will automatically redirect users and crawlers to the new page.
XML sitemaps provide search engines with a roadmap of your website’s pages and help improve crawl rates. They also indicate the priority and frequency of content updates, enabling search engines to more easily discover new content.
In Webflow, you can create an XML sitemap using the “Sitemaps” feature in the “SEO” tab.
Simply click “Add Sitemap” and Webflow will generate a sitemap for your site. You can then submit this sitemap to search engines to help them discover and index your content more efficiently.
When you have multiple versions of the same content, such as a printer-friendly version or a mobile version, it’s essential to use canonical tags.
These tags help search engines understand which version of a page is the primary one. This is useful because duplicate content can harm your site’s SEO by confusing search engines and diluting link equity.
In Webflow, you can add canonical tags to your pages using the “SEO” tab. Simply enter the primary URL for the page, and Webflow will automatically add the canonical tag to the page’s HTML code.
Outbound links are links from your site to other sites. They can impact your site’s SEO because they signal to search engines what content is relevant and valuable. However, it’s essential to use the “rel=nofollow” attribute on outbound links to avoid passing on link equity to potentially low-quality or spammy sites.
In Webflow, you can add the “rel=nofollow” attribute to your outbound links using the “Link Settings” feature in the “Designer” tab. Simply select the link and click “Link Settings,” then check the “Add rel=nofollow” box.
Core Web Vitals (CWVs) are a set of metrics that measure the user experience of your website, including page load speed and interactivity. Webflow has several tools and features to help improve your CWVs, such as minifying CSS and JavaScript files, compressing images, and optimizing fonts.
To improve your CWVs in Webflow, you can use the “Performance” tab to identify and fix issues that may be slowing down your site. You can also use the “Optimize” feature to automatically compress images and minify CSS and JavaScript files.
By implementing these technical SEO tips, you can help ensure that your Webflow site is visible and accessible to your target audience. However, it’s important to remember that SEO is an ongoing process that requires continuous monitoring and optimization. By staying up-to-date with the latest SEO best practices and regularly analyzing your site’s performance, you can continue to improve your site’s visibility and ranking in search results.
Google Analytics and Search Console are two of the most powerful tools in a website owner’s arsenal. They enable you to track your website’s performance, identify issues, and make data-driven decisions to improve your site’s user experience. In this article, we’ll walk you through the process of connecting these tools to your Webflow site.
Google Analytics is a free web analytics service offered by Google that tracks and reports website traffic. By adding a tracking code to your website, you can collect data on how visitors interact with your site, including which pages they visit, how long they stay, and where they came from. This data can help you understand your audience better and make informed decisions about your site’s content and design.
Search Console, formerly known as Webmaster Tools, is another free tool offered by Google that helps website owners monitor and maintain their site’s presence in search results. By verifying your site with Search Console, you can see how your site is performing in Google search results, identify issues that may be affecting your site’s visibility, and submit sitemaps and URLs for crawling.
Connecting Google Analytics to your Webflow site is a straightforward process. First, you’ll need to create a Google Analytics account if you don’t already have one. Once you’ve created an account, you’ll be given a tracking code that you’ll need to add to your Webflow site. To do this, follow these steps:
Once you’ve added your tracking code, Google Analytics will start collecting data on your site’s performance. You can access this data by logging in to your Google Analytics account.
Connecting Search Console to your Webflow site is also a simple process. First, you’ll need to verify your site with Search Console. To do this, follow these steps:
By connecting Google Analytics and Search Console to your Webflow site, you’ll be able to monitor your site’s performance, identify issues, and make data-driven decisions to improve your site’s user experience. So what are you waiting for? Start connecting your tools today!
There are several SEO tools specifically designed for Webflow users. These tools can automate tedious tasks, provide insights for optimization, and improve the overall performance of your site. Popular options include Ubersuggest, Ahrefs, and Google Tag Manager.Partnering with an SEO Agency Experienced in Webflow Optimization
If you are struggling to optimize your Webflow site for SEO, consider partnering with an experienced SEO agency. They can provide a comprehensive SEO audit, optimize your site for better performance, and implement ongoing tactics to improve your site’s visibility and rankings.
Optimizing your SaaS website for SEO is a must for increasing visibility and driving revenue.
Use the tips and best practices outlined in this guide to optimize your Webflow site, improve your website’s performance, and partner with an experienced SEO agency for ongoing optimization and support.
Founder of Rock The Rankings, an SEO partner that helps B2B SaaS brands crush their organic growth goals. An avid fan of tennis, and growing micro-SaaS businesses on the weekend. 2x SaaS Co-Founder – Currently working to build and scale Simple Testimonial.
Book a 1-on-1 call with our founder and walk away with a custom plan built for your business. Growth starts now.
BOOK INTRO CALL